How to Determine the Best Germination Time for Your Microgreens
Written by Garrett Corwin
Summarize with AI
Introduction
There is no right answer for how long it takes to germinate your microgreens. Each crop is unique, and each farm’s growing environment is different. We’ll give you guidelines for what to look for in a tray that is well germinated and ready to go under lights. We want to avoid undergerminating, leaving the root system underdeveloped and the crop at risk of dying. We also want to avoid overgerminating, leaving the crop leggy and behind schedule. Picking the perfect germination time will ensure the healthiest plants and the highest yields.
Defining Germination
Botanists and horticulturalists would define germination as the stage between a seed absorbing water and the embryonic root emerging from the seed. That definition is a little too restrictive for our purposes. Let’s redefine it for microgreen production. Germination is the time between planting a tray and that tray entering your production racks. Select varieties benefit from soaking their seeds prior to planting, but that’s considered a separate step. Almost all microgreen crops germinate in 3-10 days. Most vegetable microgreens, like broccoli, peas, and radish, germinate in 3-5 days. Most herb microgreens, like cilantro, basil, and shiso, germinate in 5-7 days. For a handy guide on germination times, along with lots of photos, visit our blog: Microgreen Germination Guides (29 Crops).
What to Look For
What should you look for when determining the ideal germination duration?
- Uniformity
Although every seed is a unique life form, they should germinate at the same rate for the same crop. Let’s say a standard tray of radish microgreens contains 400 seeds. You’d expect every seed to germinate at the same time and develop at the same rate. Unfortunately, a few will lag behind, and a few will sprint ahead. Keep your trays in germination long enough to ensure the laggards are healthy enough. If those are healthy and well-rooted, everyone else will be happy too. Uniformity means the crops will grow at the same rate and height. This makes harvesting easier later on.
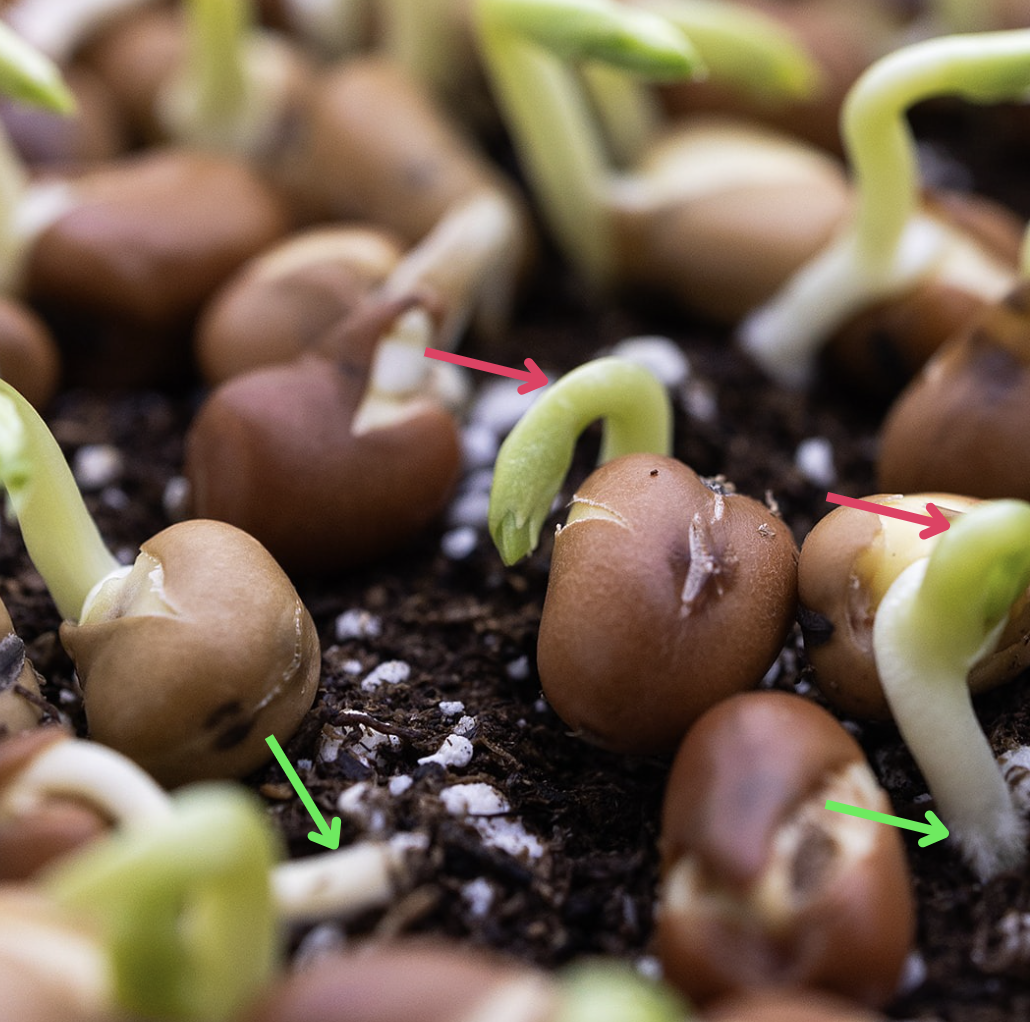
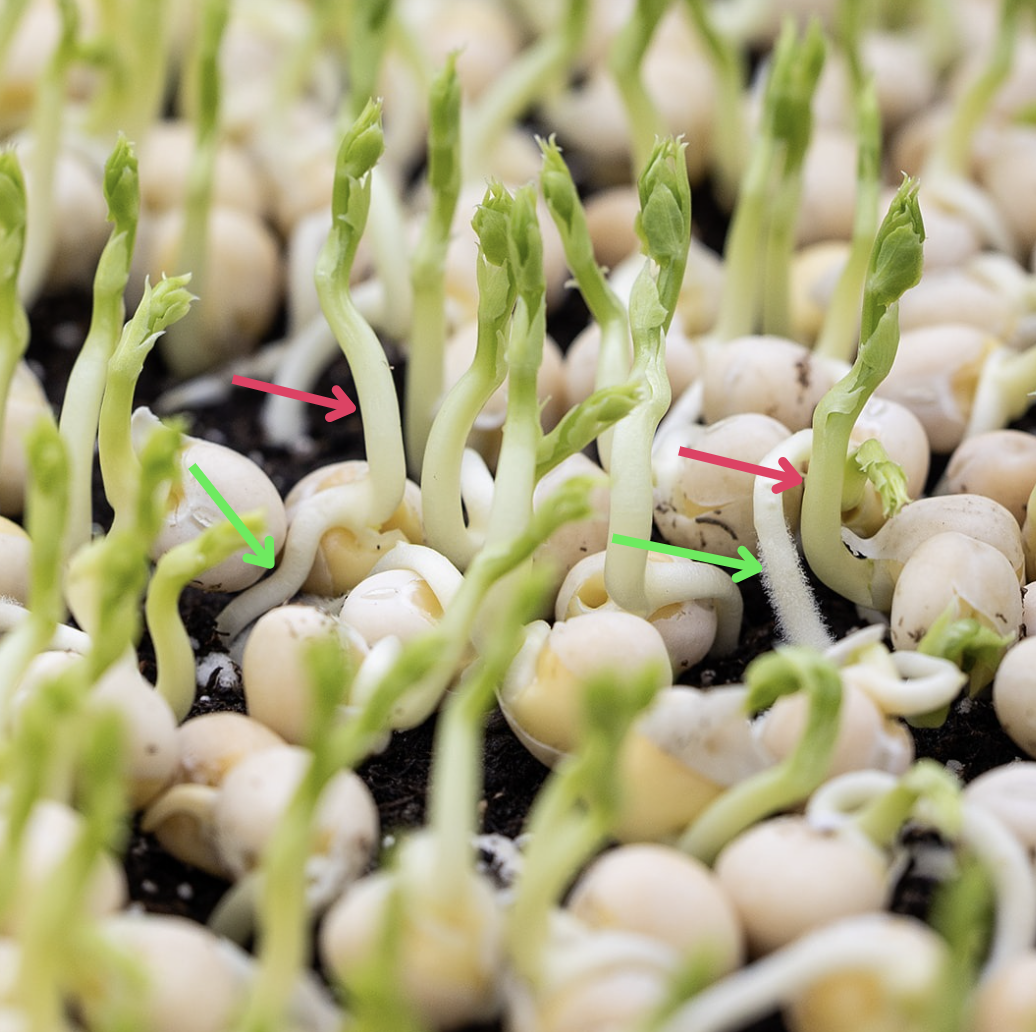
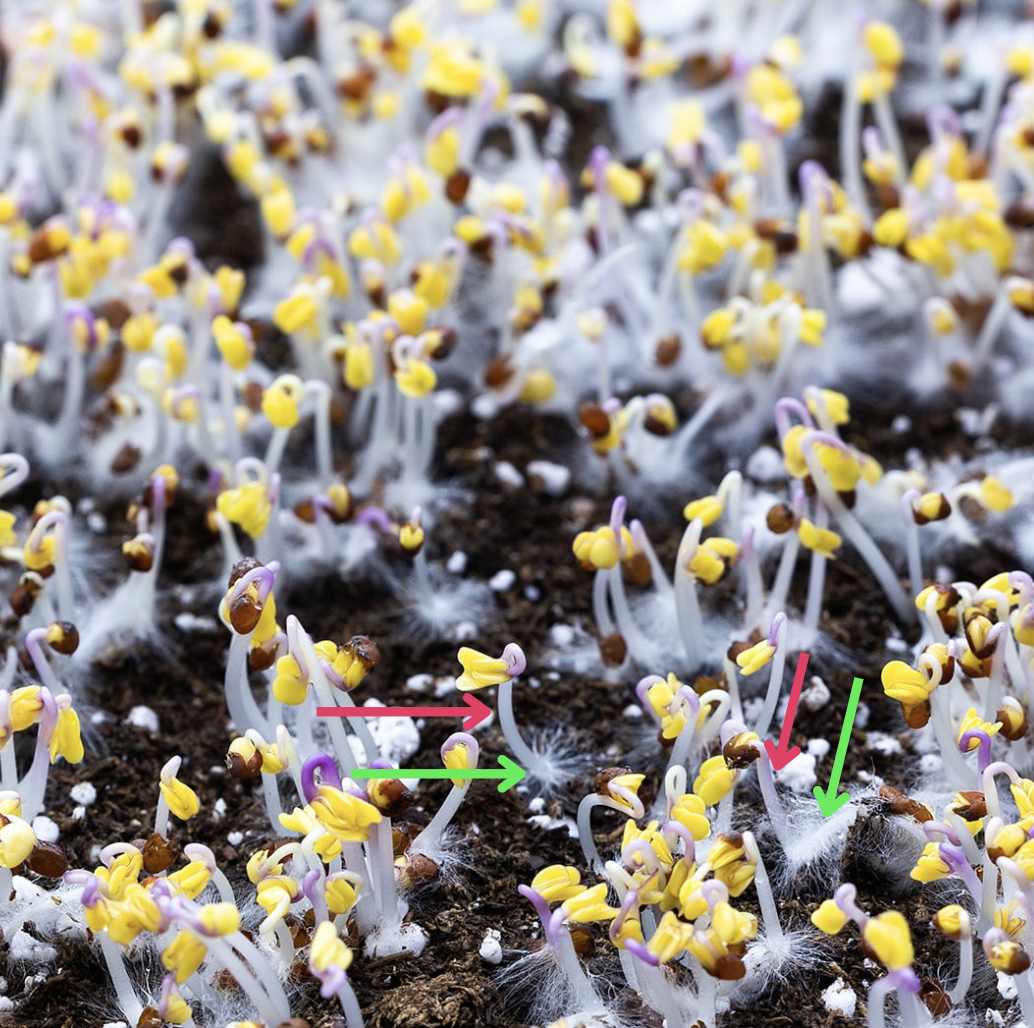
- Root Development
Although plants need the sun, or artificial lighting, to grow and thrive, they’ll die much faster without water. Water enters through the root system, so we want to ensure the root system is well developed before putting them under lights. The first root to emerge from the seed is called the radicle. The little fibers emerging from your nascent root are called root hairs. Root hairs are not the same as mold fibers. You can learn more about the difference here - How to Tell the Difference Between Mold & Root Hair in Microgreens. A tray that’s ready to exit germination will have a radicle that is buried deep in the soil. You’ll often see root hairs at the soil surface, which is a sign of a healthy root system. You can also check to see if the roots have grown through the soil and popped through the holes in your tray. Below are three examples of healthy root systems for fava, tendril peas, and kohlrabi. The green arrow points to the radicle and root hairs.
- Stem Elongation & Pushing Up
The nascent stem emerges shortly after the radicle and begins reaching for the sky. The red arrows in the photos point to the young stems. The young plant emerges with a distinct bend in its stem, called the hypocotyl arch. The plant will "unfold" as it grows. It will straighten out and lose that bend. Another good sign of healthy plants is that they push up the trays and the paver above them. Most varieties germinate best when you stack them one on top of the other and then place a 5-15 pound paver on top. Small-seeded varieties, such as broccoli and radish, can germinate with power. Their stems push upward, lifting the weight above them.
- Peeking Out
When you stack germinate microgreen trays, they don’t nest perfectly. This means that the seeds along the inner edges of the tray can prematurely emerge from between the cracks. Those microgreens can sense the light hitting the soil near the edge of the tray, and they begin growing up and out. If you’re looking at a stack of germinating trays, you’ll see small plumes of microgreens poking out from the side of the trays. This is a great sign that the seeds are well established and you’re okay to put the tray under lights.
Conclusion
My best advice is to start with what works. Refer to our cheat sheet, then adjust the parameters as you learn. Check out the blog Microgreen Germination Guides for 29 Crops. Use the photos as visual guides and look for patterns between our examples and your trays. Use Microgreen Manager to set your germination times. This keeps them consistent every time. Prepare to be flexible as well. Germination times can fluctuate by a day or two if your farm is too cold or too hot. Air temperatures can massively impact growth rates. Let’s say you programmed your arugula to have a germination time of three days. You use the guidelines from above, and after three days in germination, it looks like it’s not ready yet. You can easily change the task date for “Under Lights” for your arugula by moving the task - “Move Task to Tomorrow.” If the arugula develops faster than normal, find the “Under Lights” task and mark it complete ahead of schedule.

Related Articles
How to Water Your Microgreens: Top or Bottom?
What Does “Grown-to-Order” Microgreens Mean?
Selecting the Best Growing Medium for Your Microgreens: Pros & Cons
How to Soak Your Microgreen Seeds to Improve Germination
Why Should You Weigh Down Your Microgreens During Germination?
Share this post: